Thursday, October 6, 2016

How To Make The Easiest Burlap Wreath Ever!!


Hello everyone! I hope you are having a wonderful Fall Day!!

Just the other day I saw an idea on how to make a very easy burlap wreath. So I went out and bought some burlap, came home and made one of my very own! It was so easy to make and it came out awesome! So today I am going to let you in on how you can make your own!
This is a perfect Fall craft! (Which is why I am thinking of making a few of these for craft shows I have coming up!)
burlap wreath

Supplies:
  •  Burlap Ribbon: For a standard wire hanger I used, 10yrds/30en wire.ft and it was plenty. It was 5 to 6 inches wide. If you are making a large wreath you will need more. 
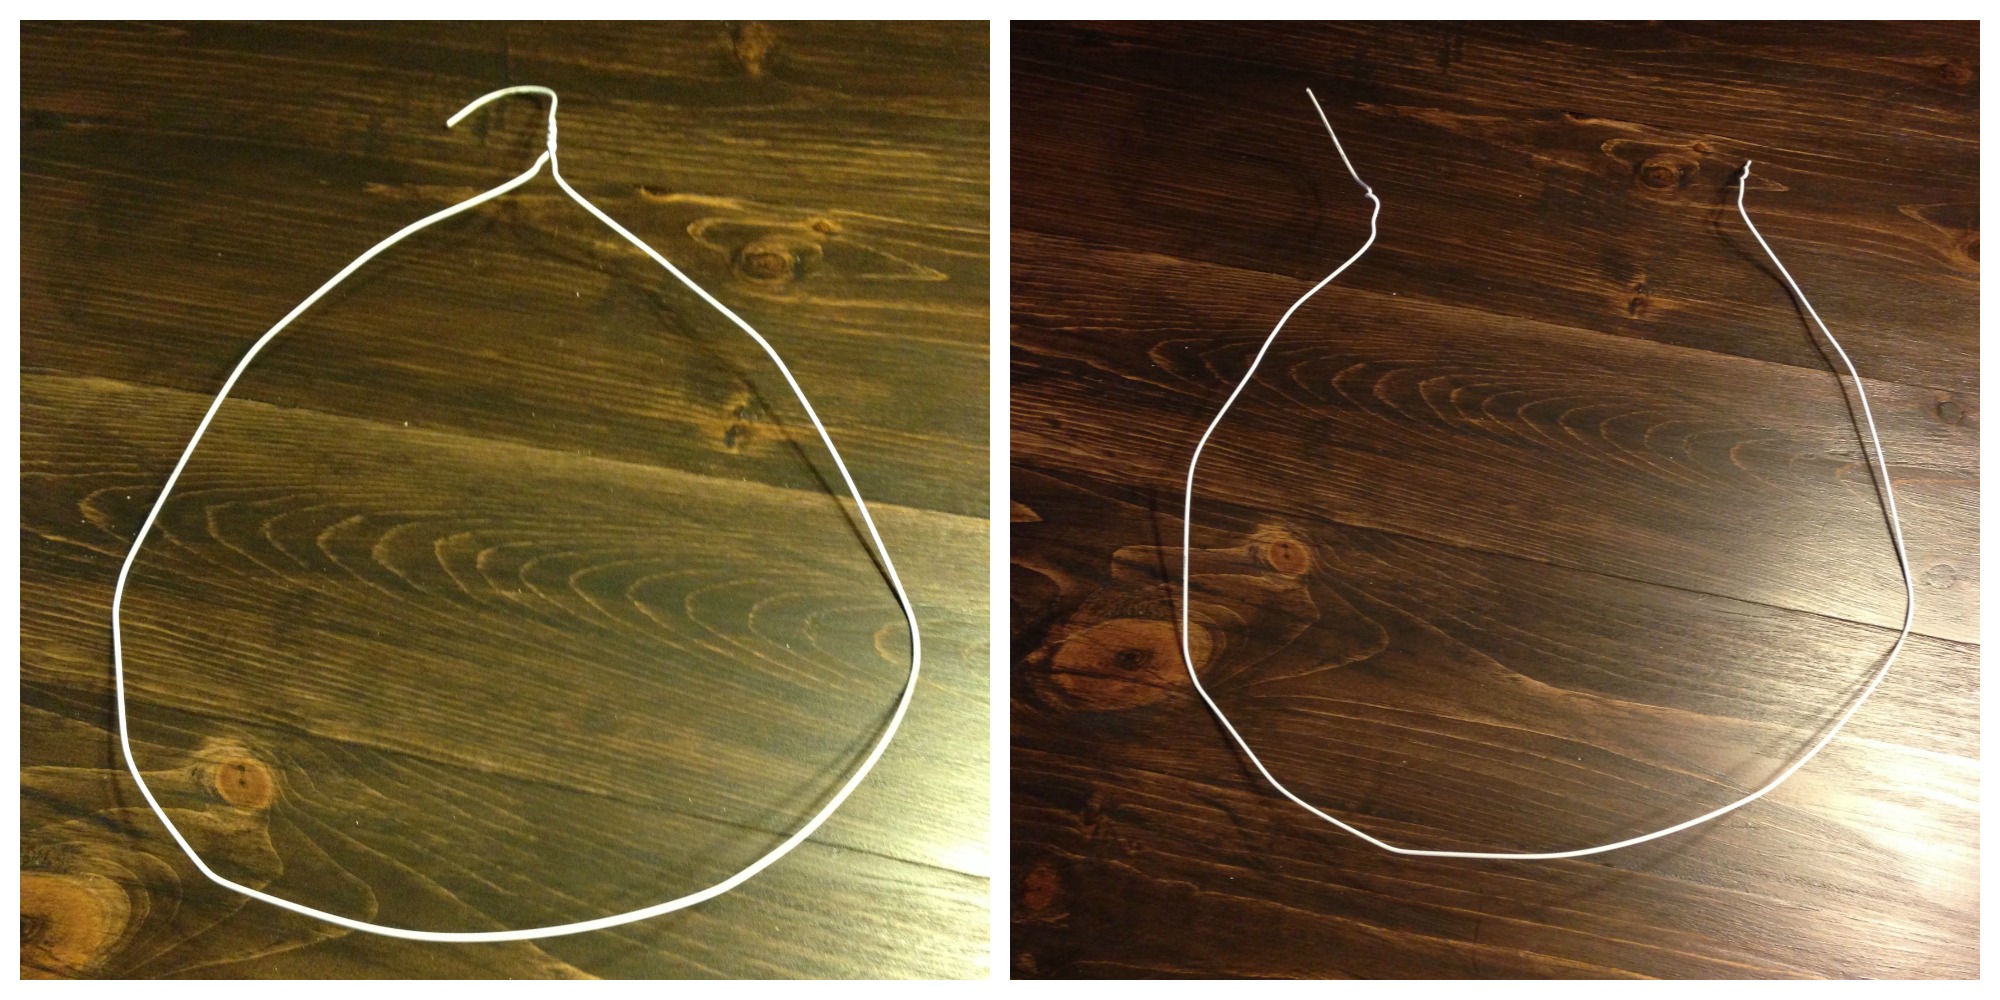
  • Wire Hanger: If you don't have one dry cleaners might sell you some for cheap. 
  • Embelishments: Depending on the holiday or season you decorating for you can use anything you like! 

Step 1. Depending on the type of hanger you have, unscrew the top hook and if your hanger has a cardboard bar, remove that as well to reveal an open wire.


Step 2. With the burlap ribbon, I struck the hanger through a hole in the corner of the ribbon then went about 3-5 inches (the bigger the gap the fluffier it will be.) and stuck the hanger through a hole on the opposite side of the ribbon.


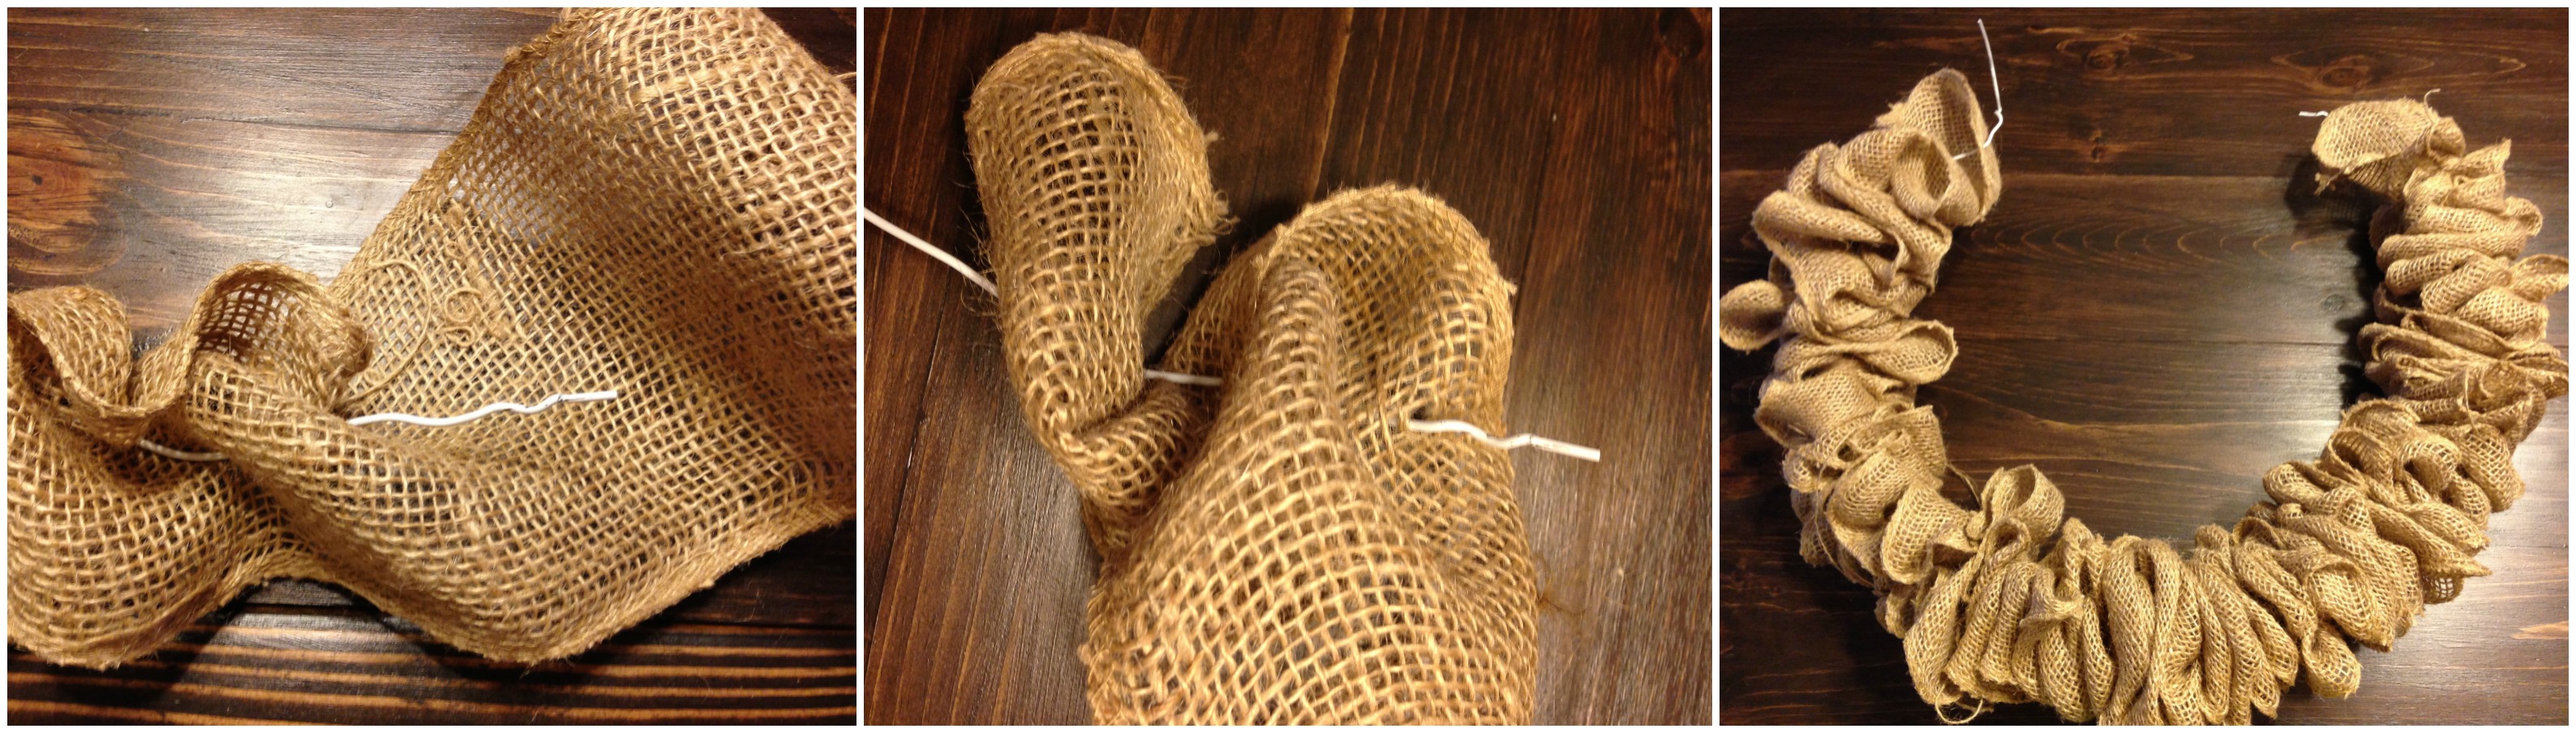
Another 4 inches and placed the hanger through another hole on the opposite side etc, etc, etc. So you are zig zagging through the ribbon about every 3-5 inches. The shorter the distance in between where you place the hanger the tighter the wreath and the longer the distance, the fuller it is.

So to make it a little more clear, you are putting the hanger through the ribbon then crossing over and putting it through again Yo side you came out onu will go through the SAME side you came out on. There is No Twisting!

The roll of burlap I used was 10 yards and this was perfect for the size I wanted. When I was done with the roll, I simply just folded the corner into the wreath.

IMG_3811

Now is where you can get creative. I have seen so many neat embelishments to adorn a wreath. And sky is the limit when it comes to decorating your own! 


I hope you like this craft idea! 
So what do you think? Leave me a comment below with your thoughts and I would love to see your recreations if you decide to make one of these beautiful wreaths!!

Take Care!

Angela

Thursday, September 15, 2016

Homemade Pumpkin Spice Sugar Scrub!


Hi guys! I hope you all are having a wonderful Fall day!
Today I have a wonderful Pumpkin Spice Sugar Scrub recipe for you!!
This Pumpkin Spice Sugar Scrub is perfect for the Fall season! Use this scrub to pamper yourself or use it as a gift! The holidays are coming up soon and this would be perfect for a Halloween or Christmas gift!!

Learn how to make a Pumpkin Spice Sugar Scrub with a Free Printable Tag by Uncommon Designs

Sugar scrubs are very easy and cheap to make. To make pumpkin spice sugar scrub, you will need coconut oil, brown sugar and pumpkin pie spice. The ratio of coconut oil to sugar is 2 to 1. I filled two small jars and used 1 cup coconut oil and 1/2 cup brown sugar. 
Place coconut oil into a blender and blend until smooth. Add the brown sugar and 1 tsp. pumpkin pie spice and blend together. If you want the scrub a bit coarser, add more brown sugar until you get the consistency that you would like. 

Learn how to make a Pumpkin Spice Sugar Scrub with a Free Printable Tag by Uncommon Designs

Transfer the scrub to a jar and add a pretty tag. I love giving scrubs as gifts because who doesn't like to get pampered? You can create an entire set of sugar scrubs in different aromas for really cheap! 
Package them up and your friends and family will love you!
Think hostess gifts, mom-to-be gifts, new mom gifts. These would also be great in goody bags if you were throwing a spa-themed party.

Learn how to make a Pumpkin Spice Sugar Scrub with a Free Printable Tag by Uncommon Designs

I've created some free tages for you to use. these are 2.5" circle tags. You can either print these onto sticker sheets and attach to the lid or you can tie them on with orange baker's twine. 

Learn how to make a Pumpkin Spice Sugar Scrub with a Free Printable Tag by Uncommon Designs

Learn how to make a Pumpkin Spice Sugar Scrub with a Free Printable Tag by Uncommon Designs


Learn how to make a Pumpkin Spice Sugar Scrub with a Free Printable Tag by Uncommon Designs

Download these sugar scrub tags here. These tags are for personal use only.


I would love for you to visit us at Heavenly Handmade Crafts on Facebook!

Until nest time, Take care!
Angela


Thursday, August 18, 2016

Making and Preparing Yummy Apple Butter!


Hello fellow crafters! I hope you all are having a wonderful day! I want to thank you for stopping by Heavenly Handmade Crafts blog!

Though it is only August I have recently begun to feel that familiar urge to start crafting and preparing for craft season! I am a huge fan of the Fall season and I get so excited for all the great things that come with it!

I actually have already been seeing pumpkin spiced food and even candles in stores, including fall merchandise. It puts a smile on my face. :)

So in prepertation fo upcoming craft shows, I decided to make a batch of my very favorite Apple Butter, can it and get it ready to go!

You would not believe how AMAZING my house smells while making this!


I have canned and am planning on making a few more batches soon, but I thought I would show you the finished product! I have plans to put a little more homemade touches to the outside of the jars, but this is what they look like so far! 


Most of you that follow Heavenly Handmade Crafts on Facebook, have already seen pictures of this amazing apple butter all canned up! 

A lot of people have asked me what the recipe is and so today I am going to share it with you!
Here we go!

INGREDIENTS:
3 lb Apples
1/2 tsp. Allspice
2 tsp. Cinnamon
1/2 tsp. Cloves
1 tsp Nutmeg
1 dash of Salt
3 Cups of Sugar
3/4 cup of Water or Fresh Apple Cider.

DIRECTIONS:
  • 1. Fill Crock-pot 3/4 full with peeled, cored and sliced apples. Add the remaining ingredients and stir until evenly mixed. 
  • 2. Cover and cook on low setting overnight or until the butter is of a thick, spreadable consistency. If apple butter has too much liquid, remove lid and cook on high until thickened. Stir often as butter thickens to prevent scorching. 
  • 3. Store in refrigerator for up to 6 weeks. Freeze for longer storage.
  • 4. To can the apple butter, pack into hot jars leaving 1/4 inch head space and process in a boiling water bath for 10 minutes. 


If this is your first time here, I want to welcome you! If you are interested, hop on over to our Facebook page Heavenly Handmade Crafts, where you can see many other pictures of all the other crafts that we make and have made over the past year! Don't forget to hit the like button!!

Hope you enjoy the recipe! 
Take care and I will see you soon! 
Angela